
Please note: Your orthosis may look slightly different from the one shown in this article, but its functionality remains unchanged. Each WIMBA product is custom-made and tailored to suit the unique needs and anatomy of your patient.
READ BEFORE USE:
- Read the entire product manual before use.
- WIMBA products are medical devices available only from authorized partners.
- The orthosis is one of the elements of an individual treatment plan - follow the recommendations of the veterinarian or physiotherapist ordering the use of the orthosis in terms of time, frequency and method of use.
- The orthosis is not intended for 24/7 use.
- Never leave your pet unattended with the orthosis in place.
- We do not recommend using the orthosis on affected skin.
- Prolonged exposure to very low and high temperatures, washing in a washing machine, drying with a dryer, modifying or interfering in any way with the structural integrity of the orthosis is prohibited.
- The dog is a living animal. The process of getting used to wearing medical supplies may be different for each dog. We recommend using positive methods such as desensitization, counter-conditioning and medical training using positive reinforcement.
- If you have any doubts about the use of the product or if the device is damaged, please contact your seller.
- The full terms of the warranty are described in the warranty card included with the product.
Table of Contents
Video manual 2
Introduction 3
Description of the Orthosis Components 4
Modular Parts 5
Straps 5
Fasteners 6
Exchanging the fasteners 6
Inserts 7
WIMBA Token 7
Reinforced WIMBA Token 7
To exchange the Tokens: 8
Recommended Use and Application 9
WIMBA Tarsus Orthosis Go Donning 10
Do’s and Don'ts of Your WIMBA Orthosis: 13
Usage: 13
Cleaning and maintaining the orthosis: 13
Storage: 14
Video manual

Introduction
WIMBA Tarsus Orthosis Go is available in two types:
- Standard
- Mini
The type of WIMBA Tarsus Orthosis Go is determined by the patient's measurements provided when placing the order.
Differences: |
standard |
mini |
|
Number of straps |
2 or 3 |
2 |
|
Removable straps (caudal) |
YES |
YES |
|
Ribbed straps |
YES |
YES |
|
Removable fasteners |
YES |
NO |
|
Key to fasteners |
YES |
NO |
|
WIMBA Token size |
standard |
mini |
|
Insert size |
standard |
mini/nano |
|
Color |
black |
black |

Description of the Orthosis Components
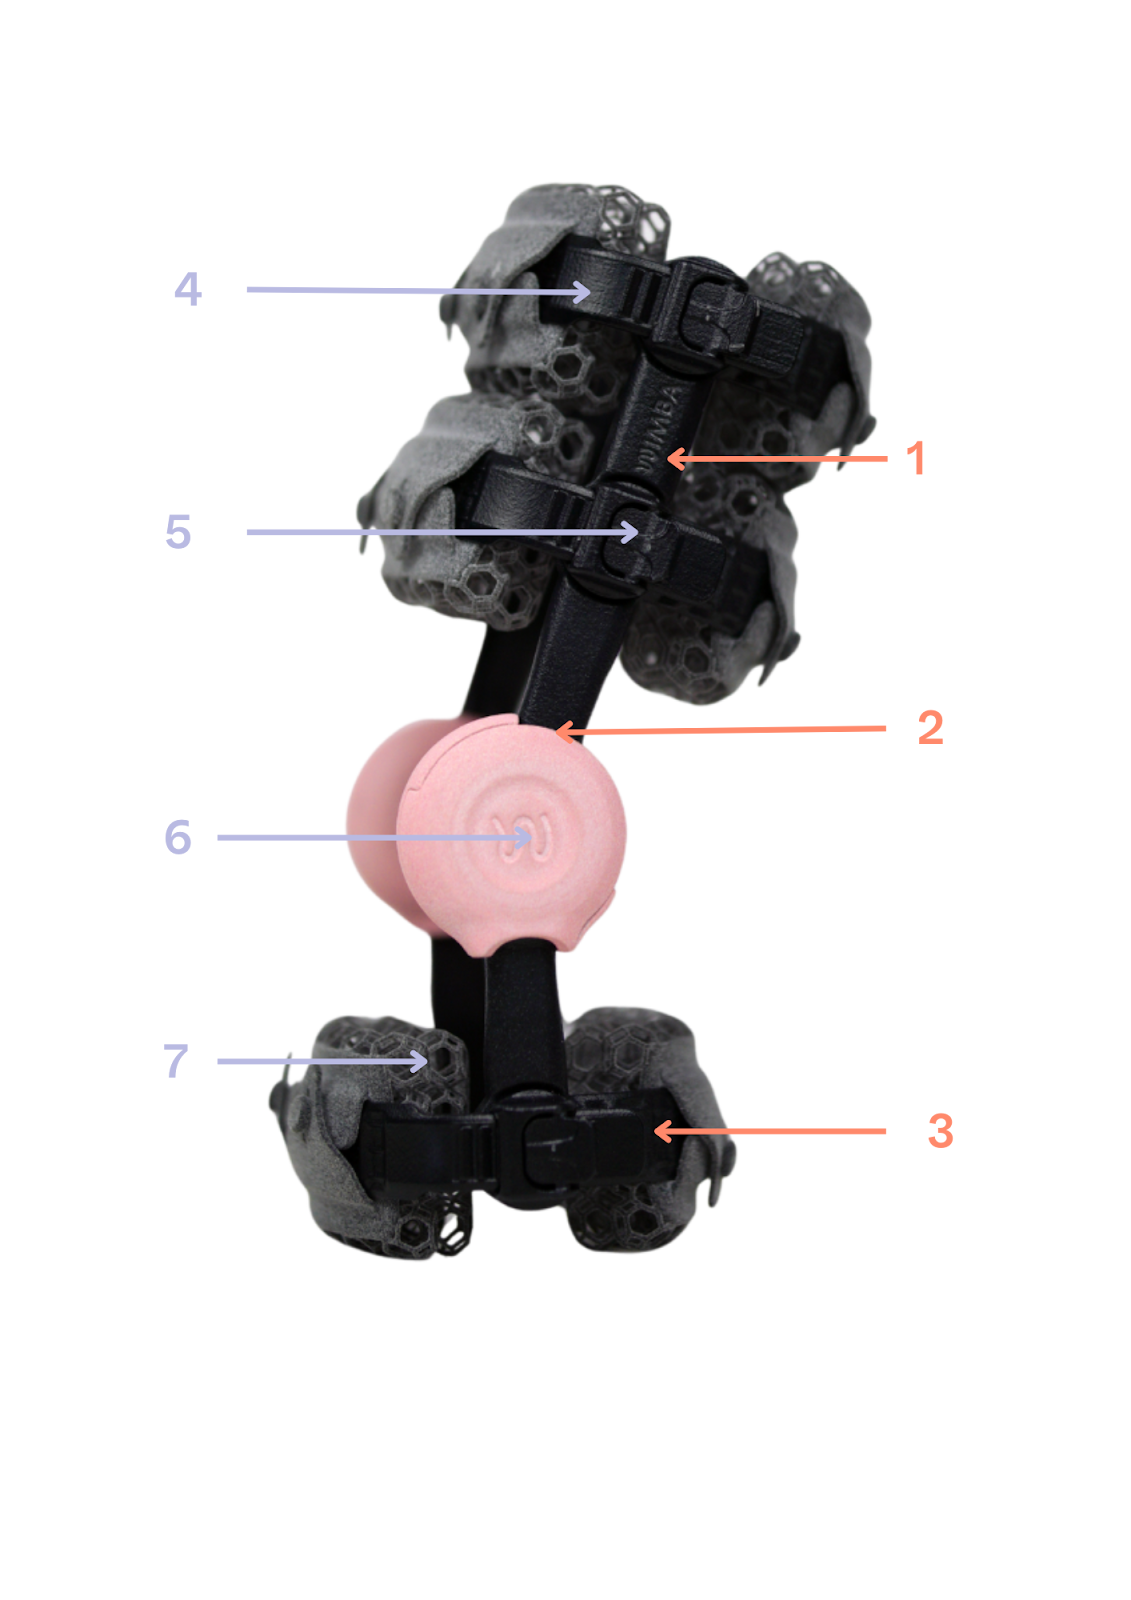
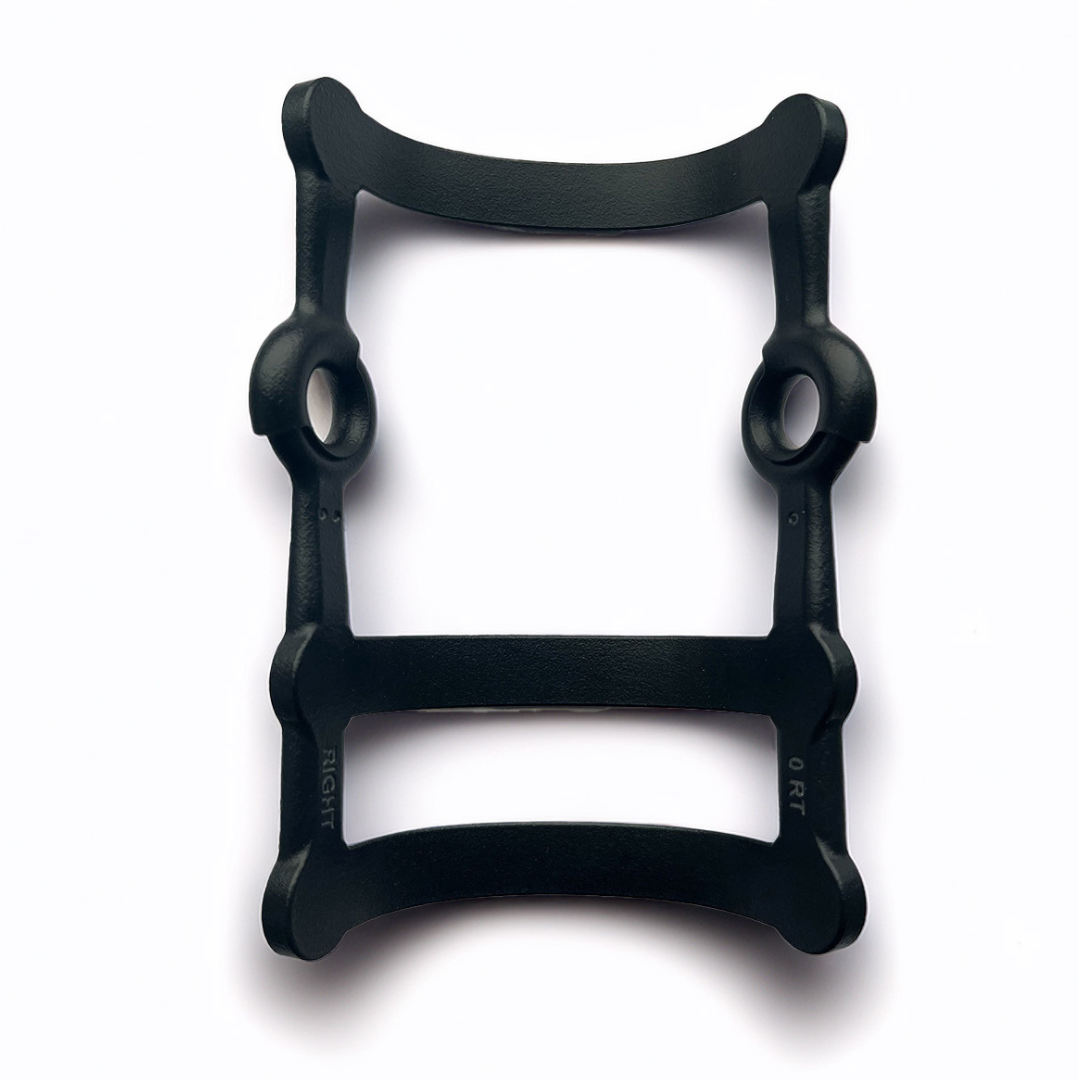
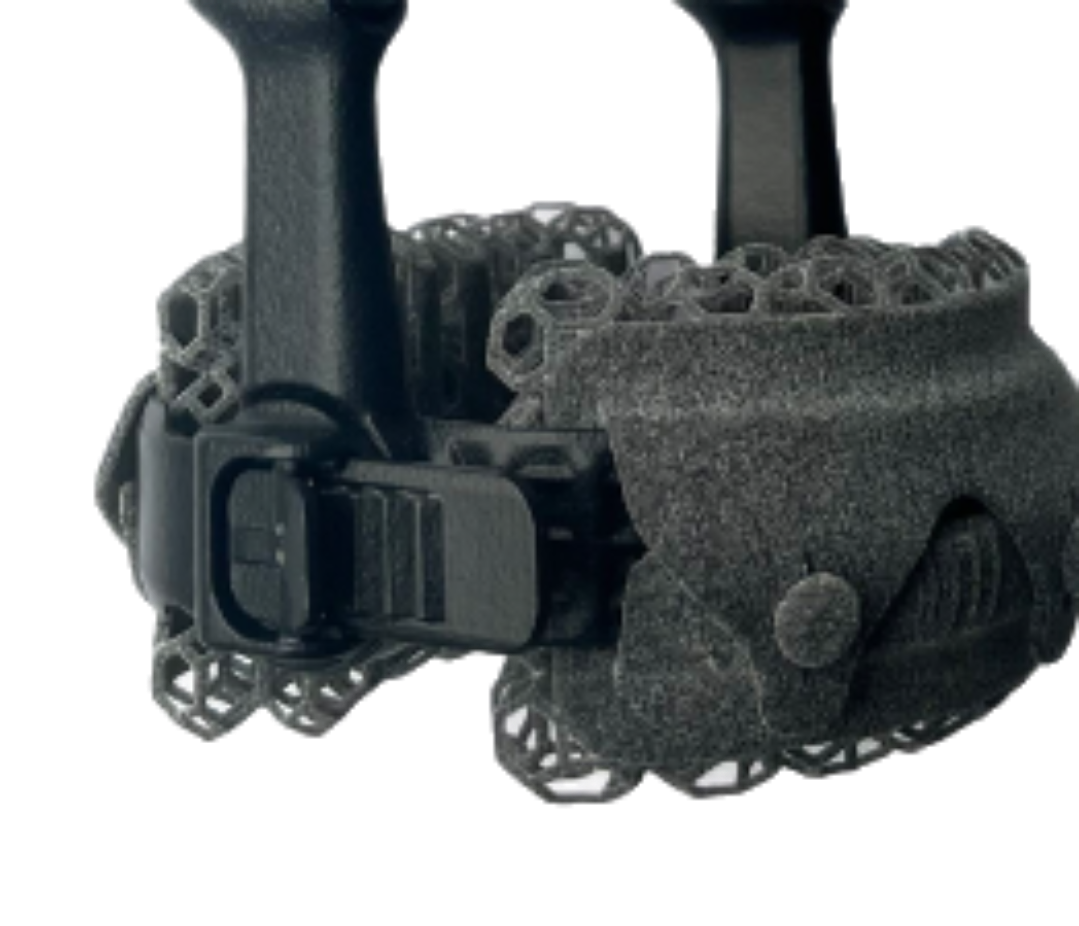
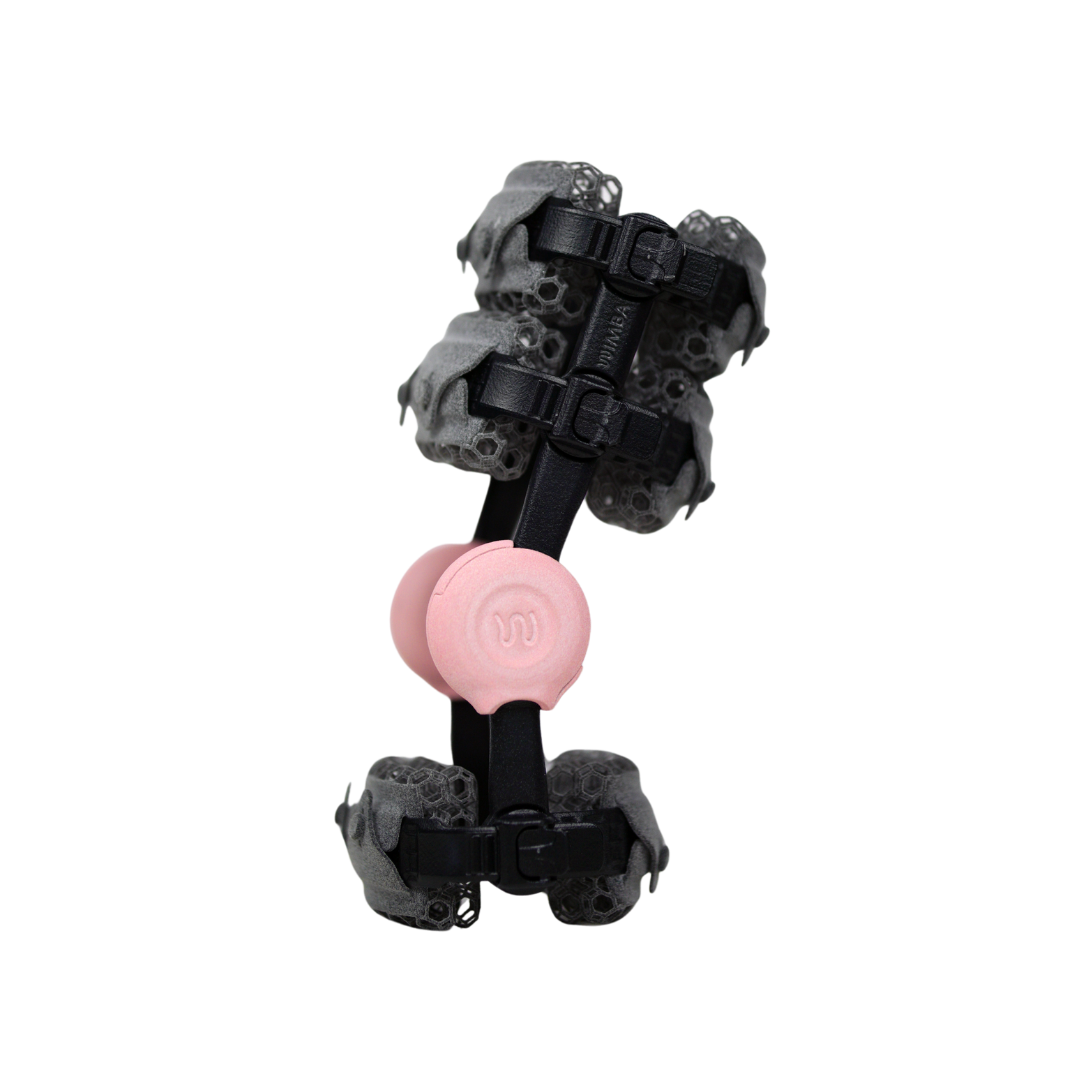
Every WIMBA Tarsus Orthosis Go consists of:
body: (1) an axis and (2) hinges, (3) straps
and removable components:
(4) snap-fastening straps,
(5) fasteners, (6) WIMBA Tokens and
(7) inserts.
|
body |
snap-fastening straps |
fasteners |
WIMBA Tokens |
inserts |
|
|
|
 |
|
 |
Removable Components
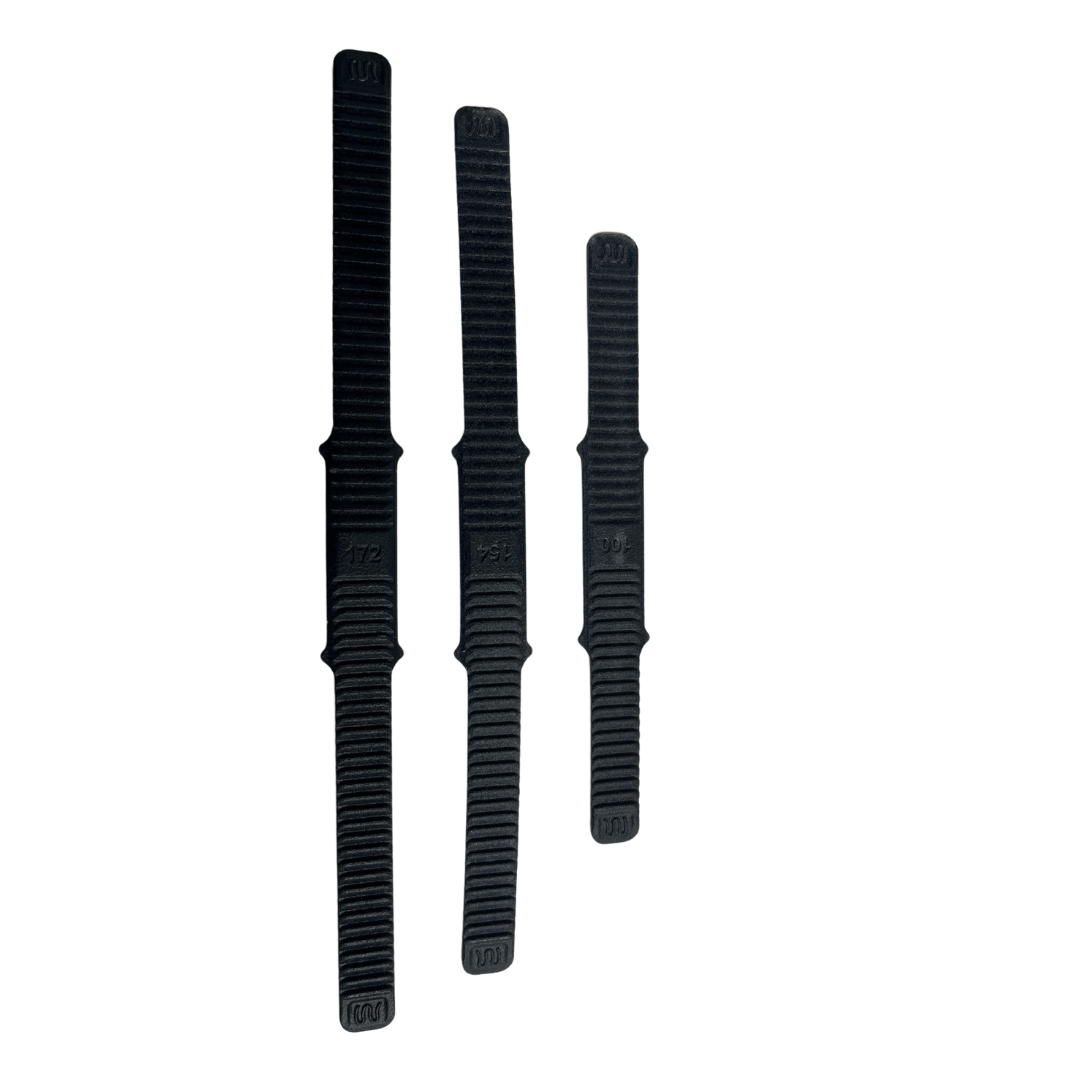
Straps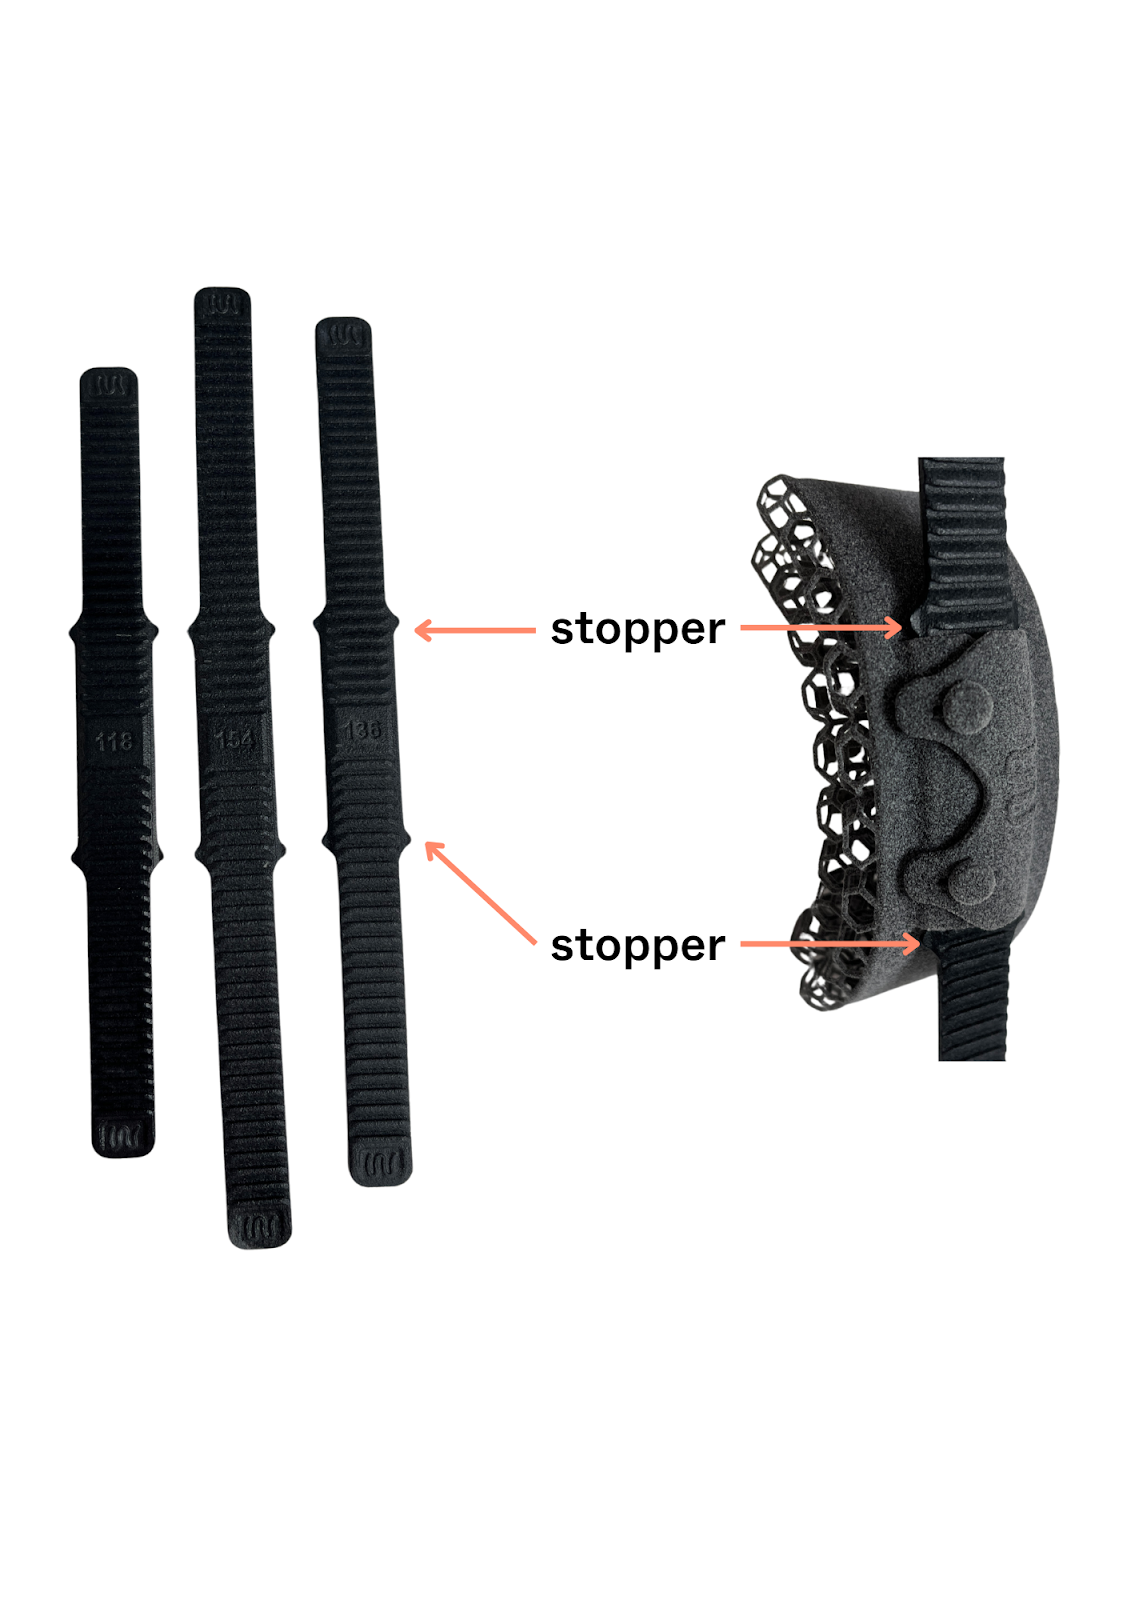
To provide the maximum possible adjustment the straps in Standard and Mini types are long serrated areas on both ends. Additionally, they have stoppers that ensure the stable position of the envelope inserts, which should be placed in the space between them.
WIMBA Orthoses Go are fastened with straps that utilize a snap-fit system. The straps are adjustable, allowing for ease of placement on the animal’s limb as well as a better overall fit. Each strap has ribs which combined with a pawl mechanism prevent them from popping up by themselves.
NOTE: WIMBA Tarsus Orthosis Go Standard and Mini have completely detachable all caudal (back) straps.
The WIMBA Carpus Orthosis Go Nano has only one fully detachable strap—the lower back strap. The remaining caudal (rear) straps open on the lateral side, meaning from the outer side of the dog.
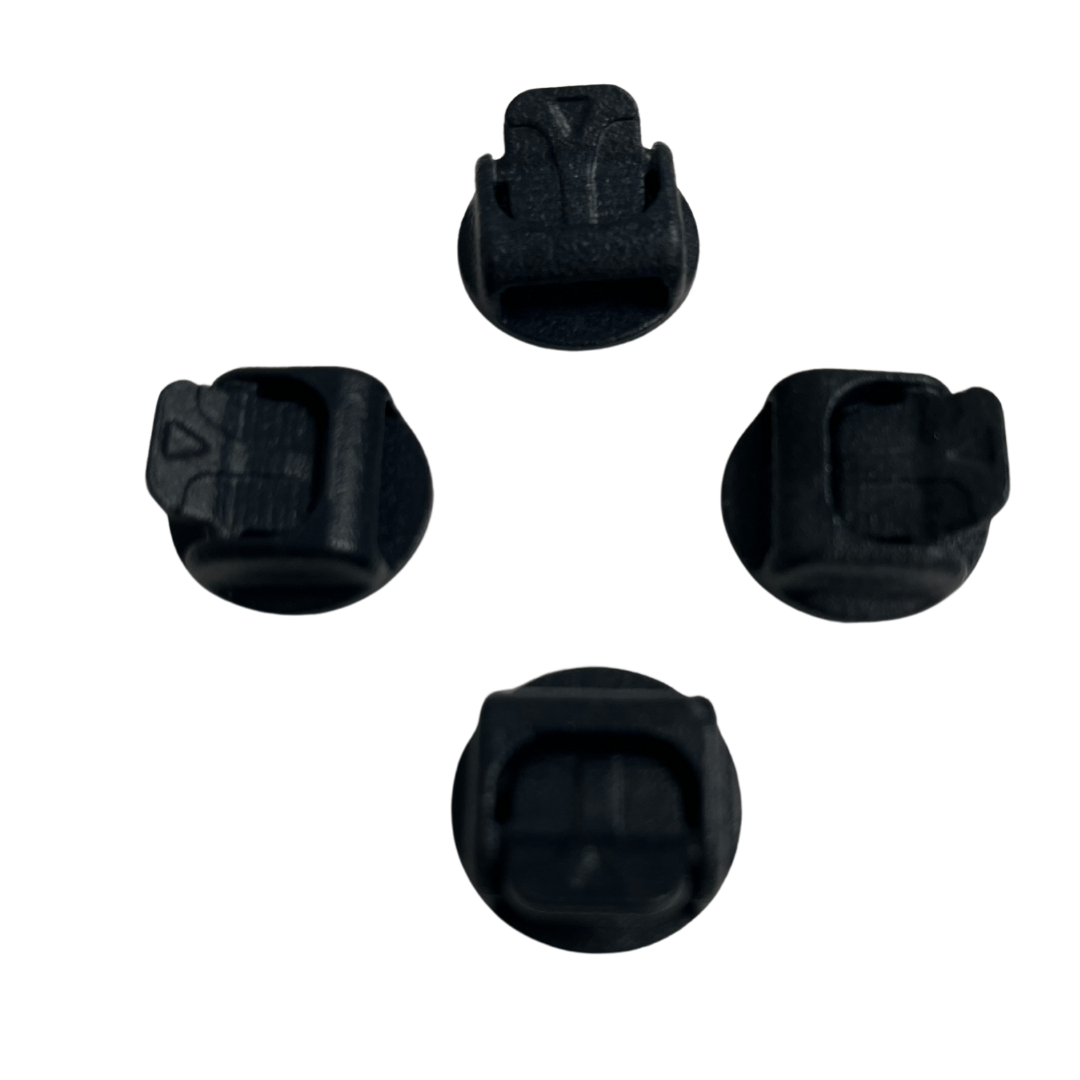
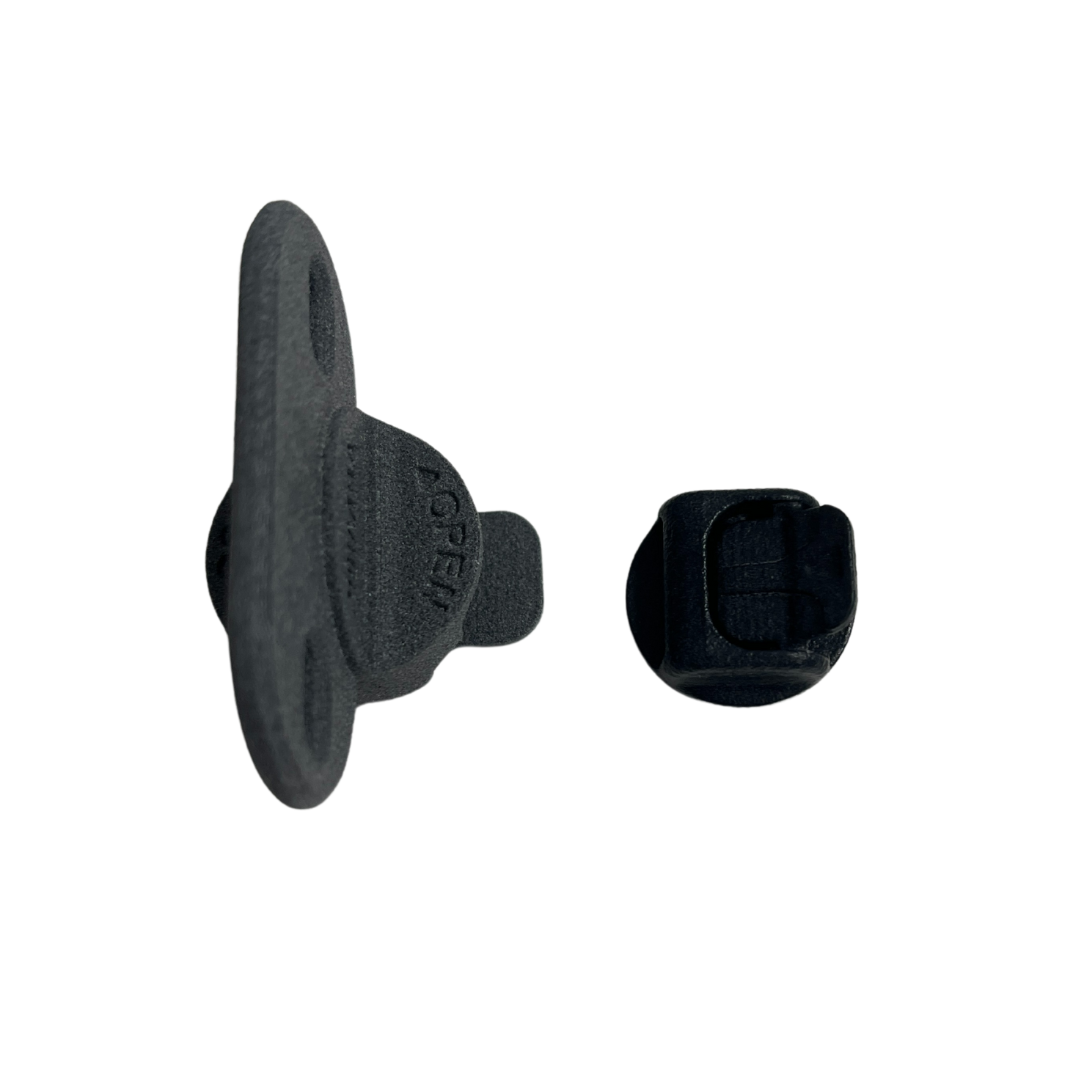
Fasteners
To fasten the orthosis, insert the straps into the specially designed slot using the release mechanism.
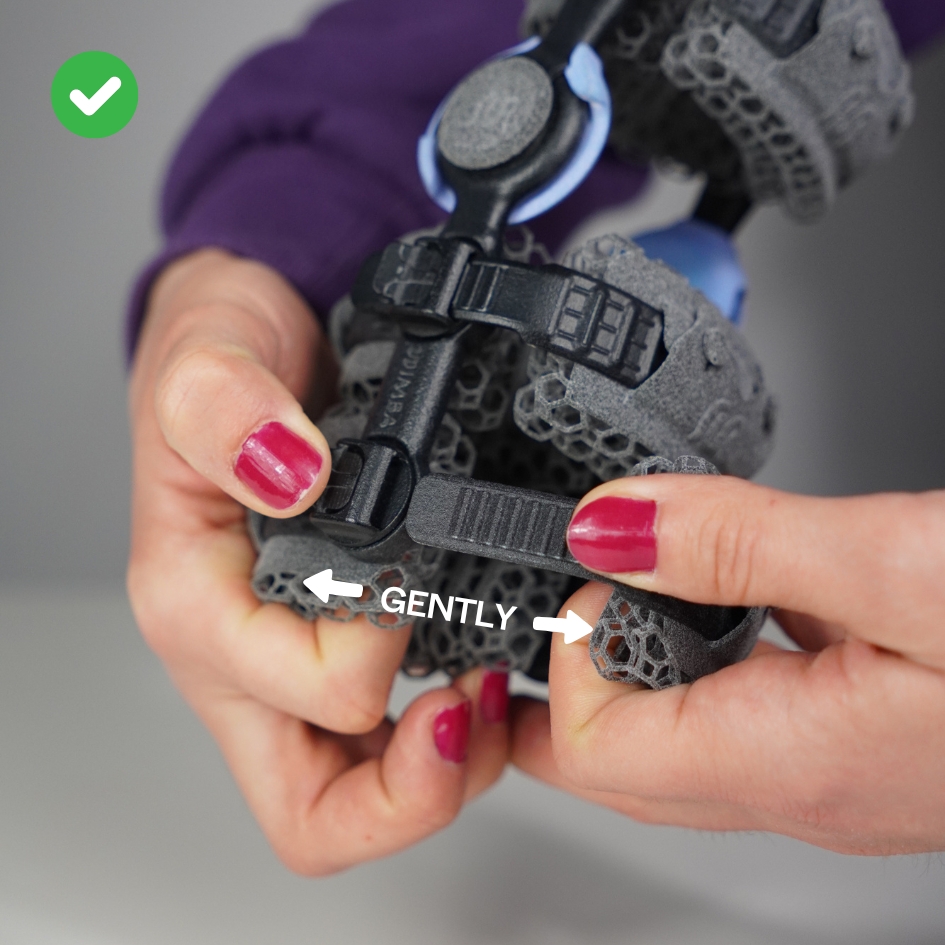
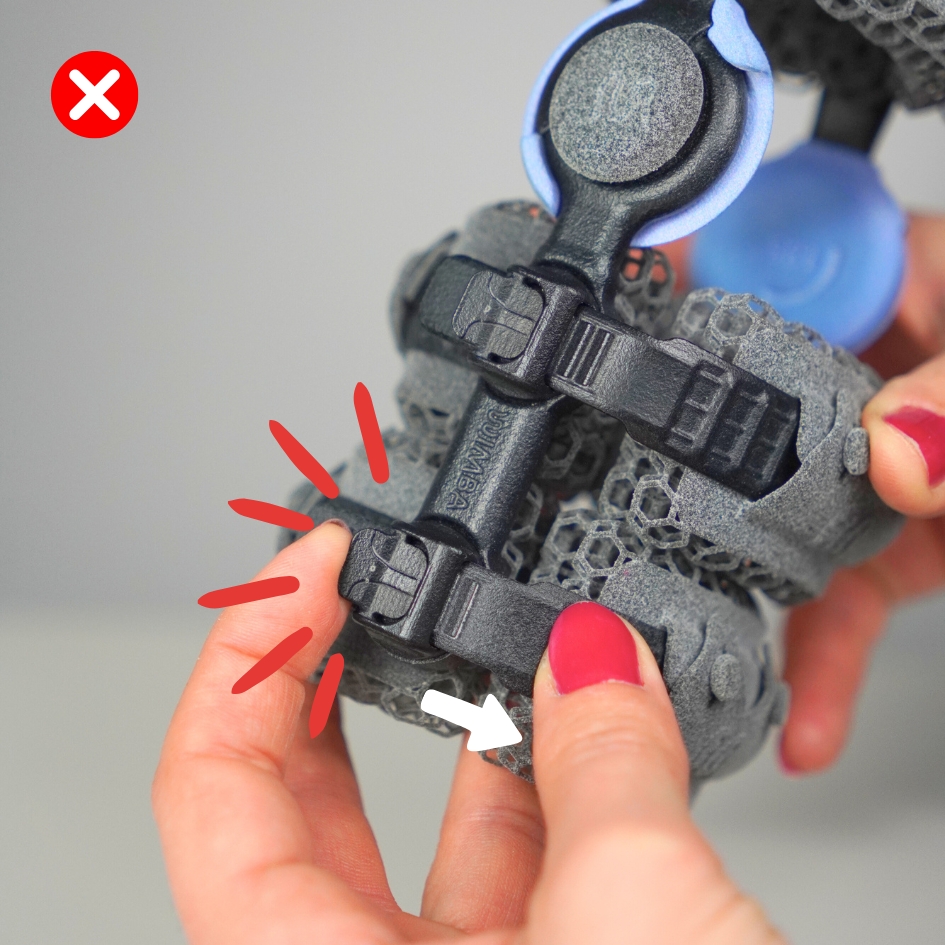
CAUTION: Excessive pressure on snaps will cause breakage.
NOTE: The release mechanism should only be pressed (towards the orthosis body). Do not pull or push in the opposite direction.
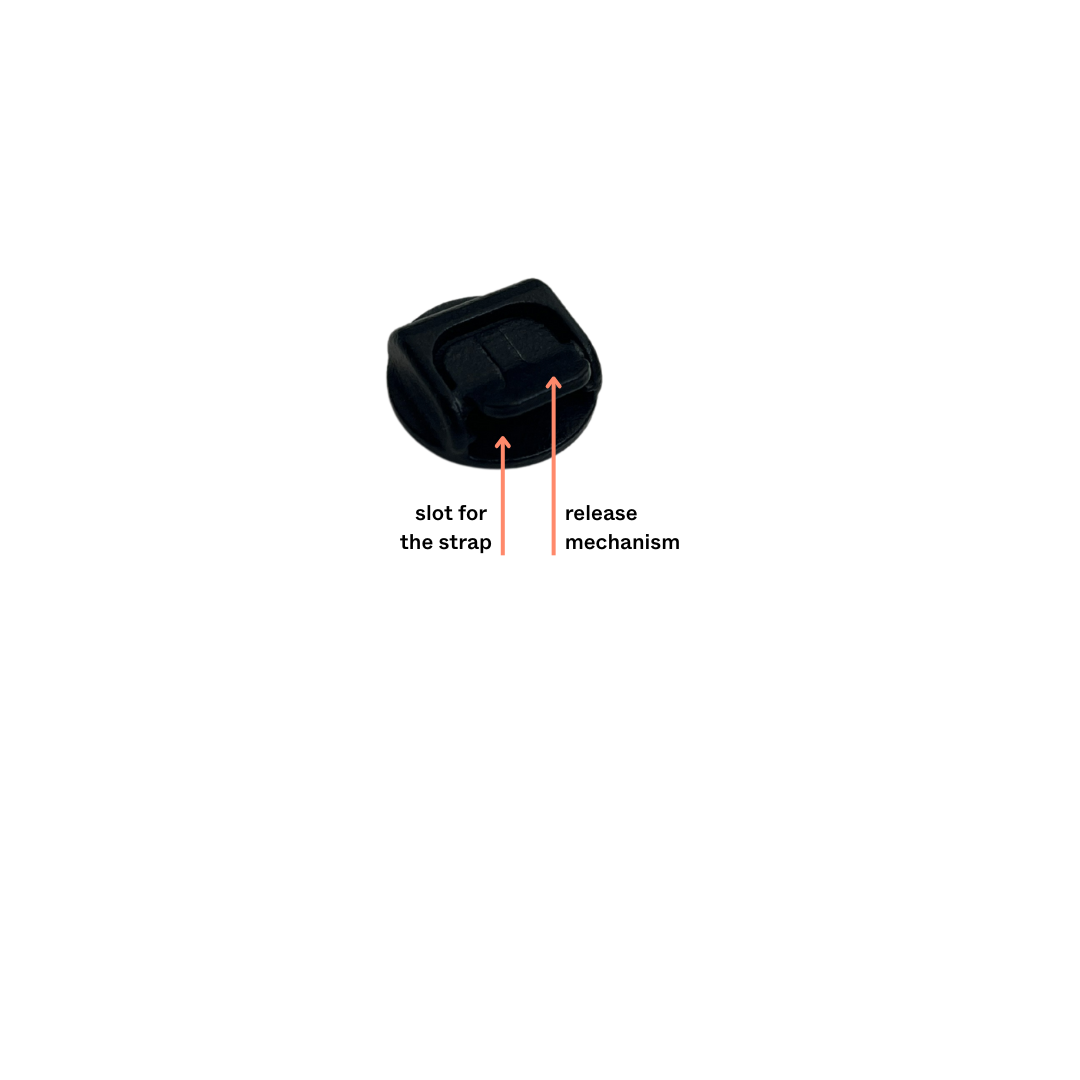
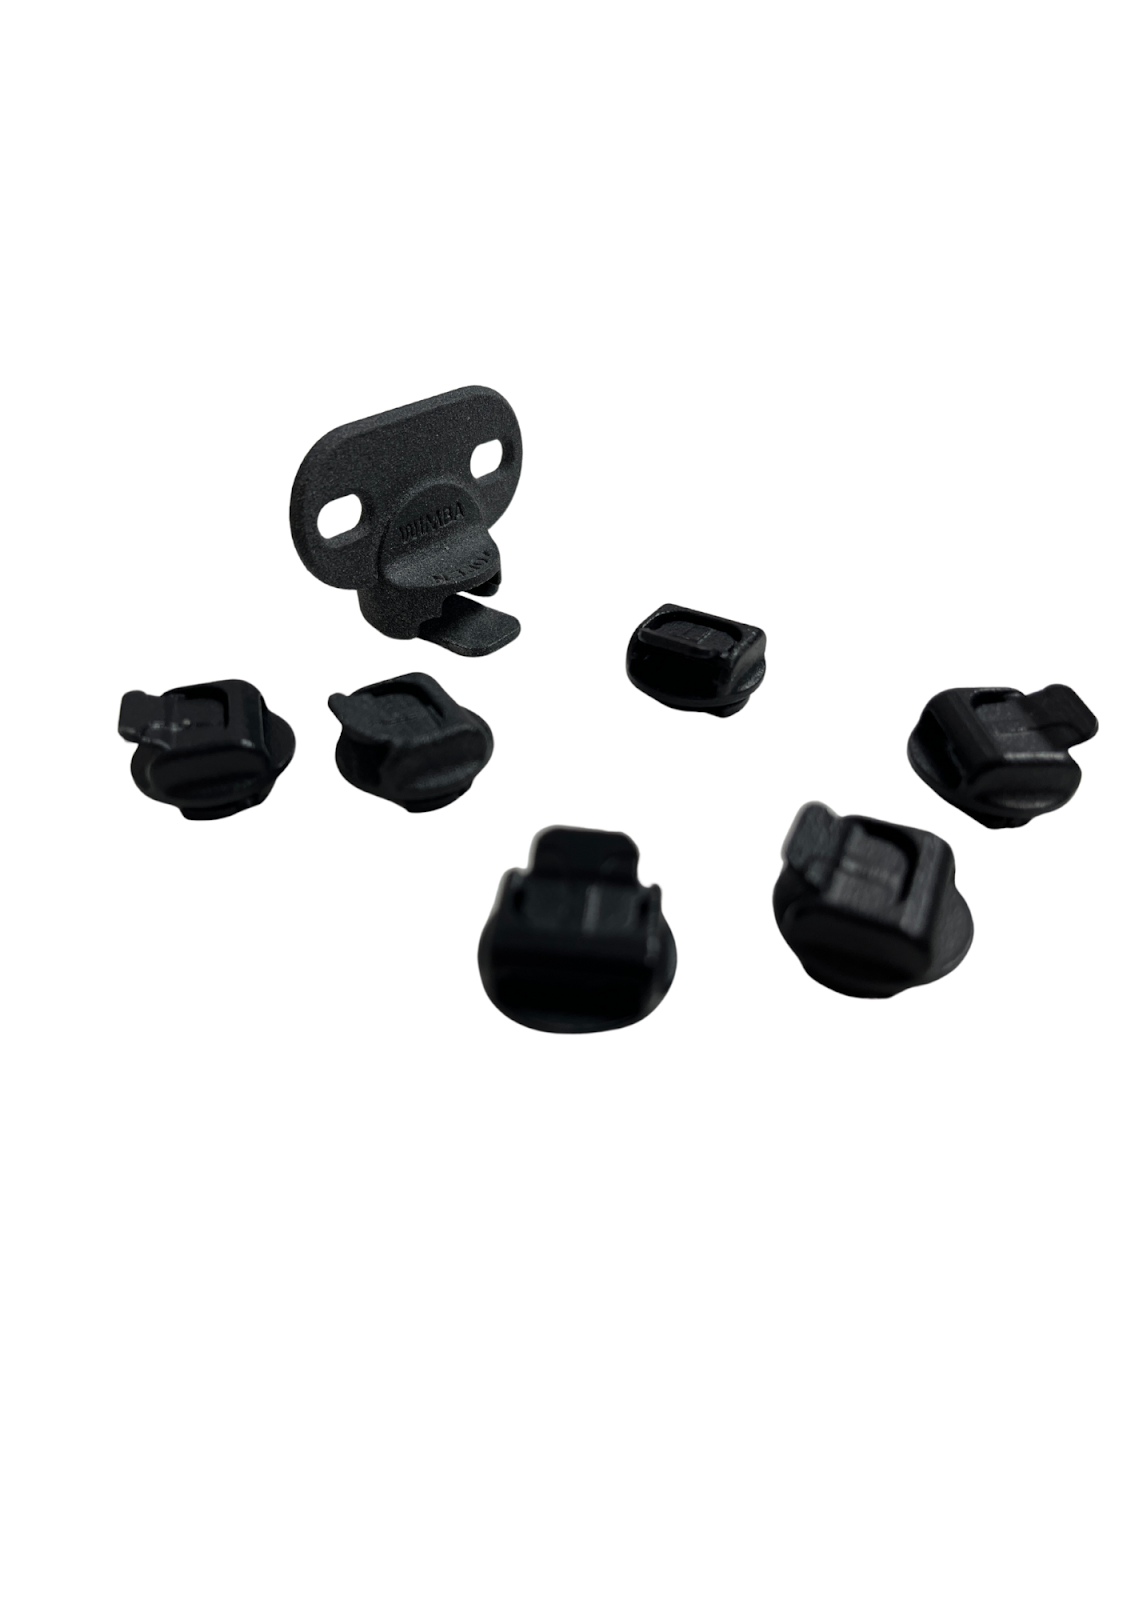
NOTE: Only WIMBA Tarsus Orthosis Go Standard has removable fasteners. To detach the fastener from the orthosis body use the key to fastener.
Exchanging the fasteners
- Insert the key into the strap slot.
- Turn it following the markings.
- When you hear a click, remove the fastener.
- Remove the old fastener from the key and attach a new one.
- Insert it into the body and turn until it clicks.
- Remove the key.
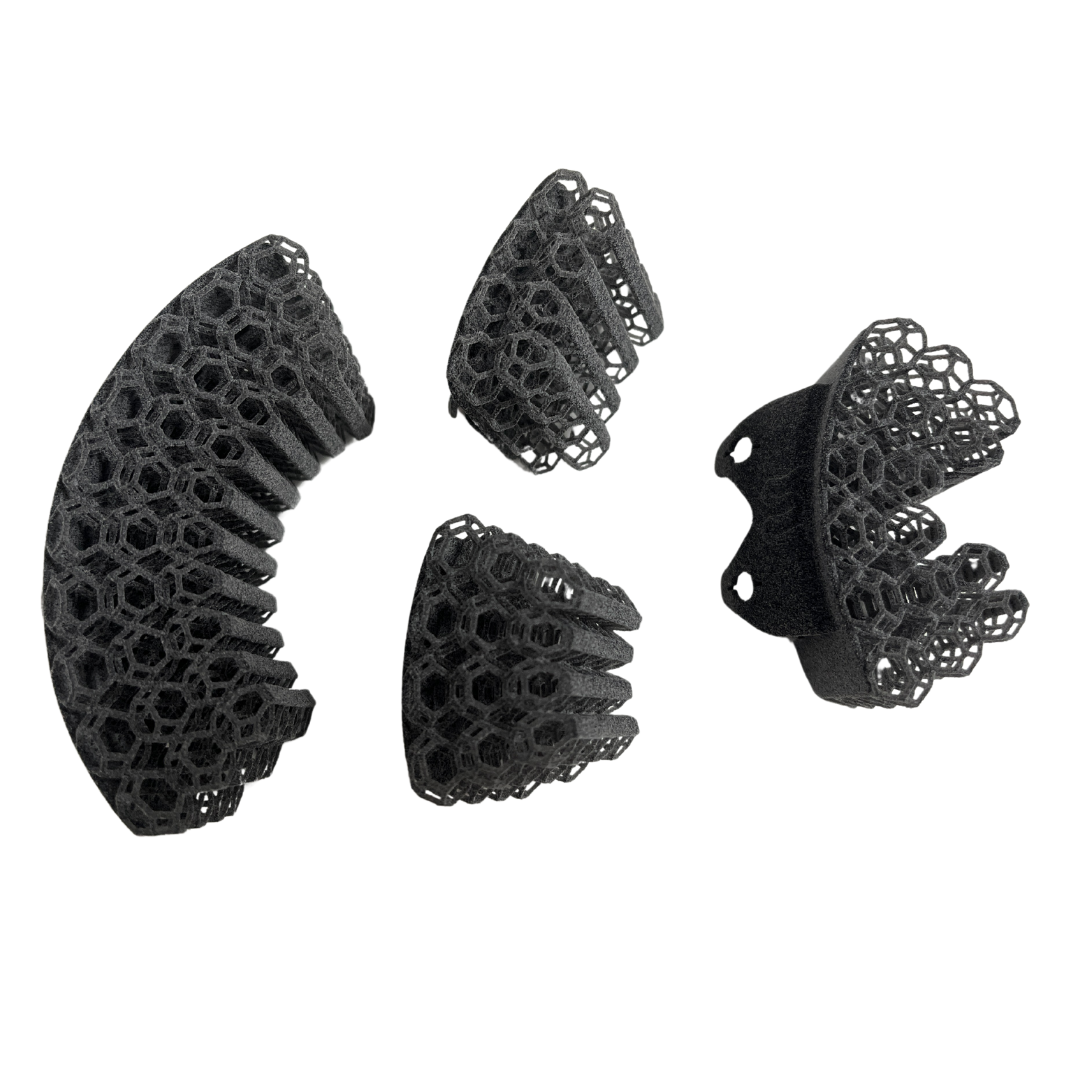
Inserts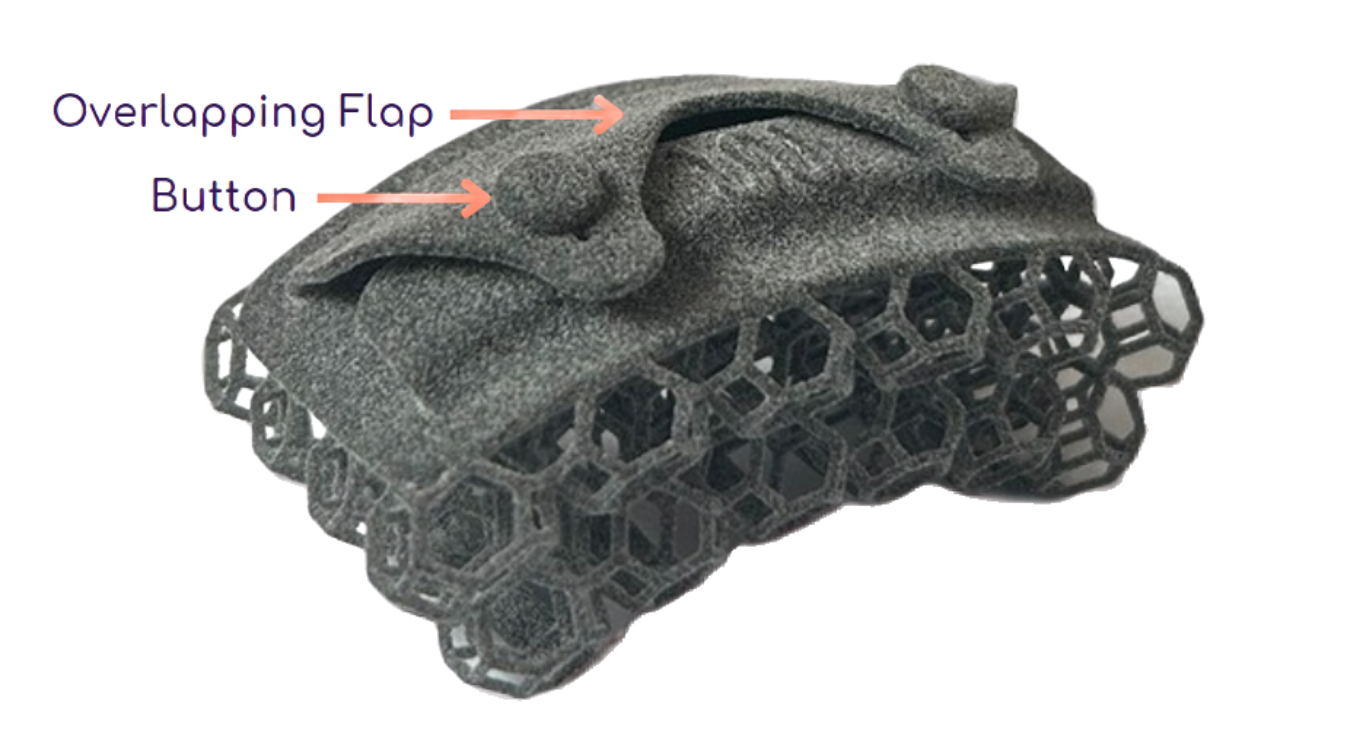
The whole product is complemented by sponge-like spacer cushions that make up the braces inserts. These allow the orthosis to be placed securely and comfortably to the animal’s limb. To unfasten the envelope, simply pull the overlapping flap and detach it from the button, then slide it off the strap.
The inserts vary in length and thickness, allowing for improved and more versatile customization to fit each individual limb. Standard-type orthoses use different insert sizes compared to mini and nano types.
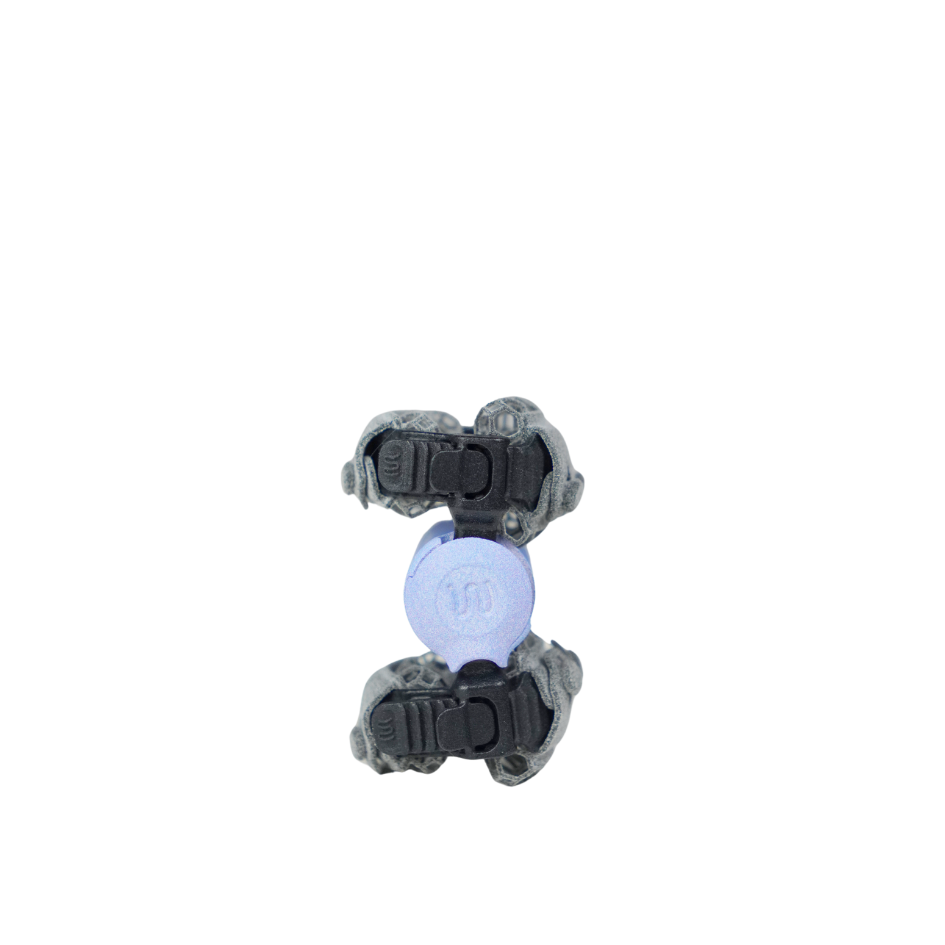
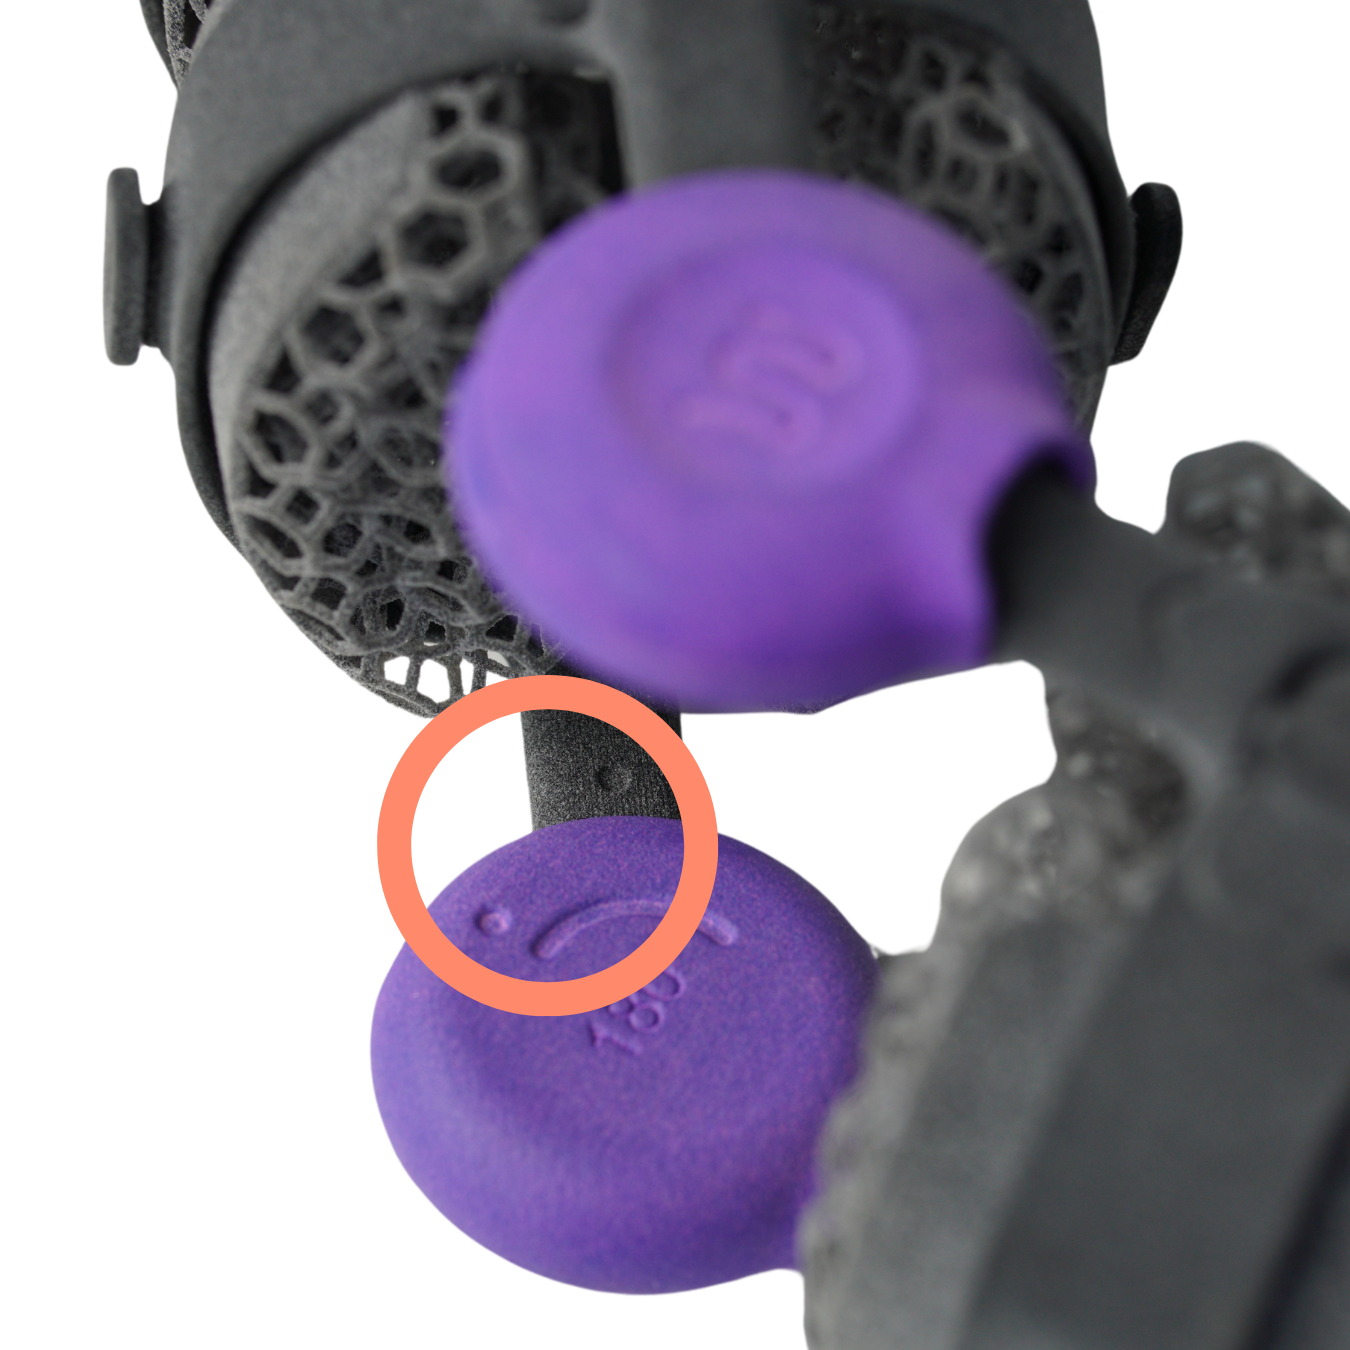
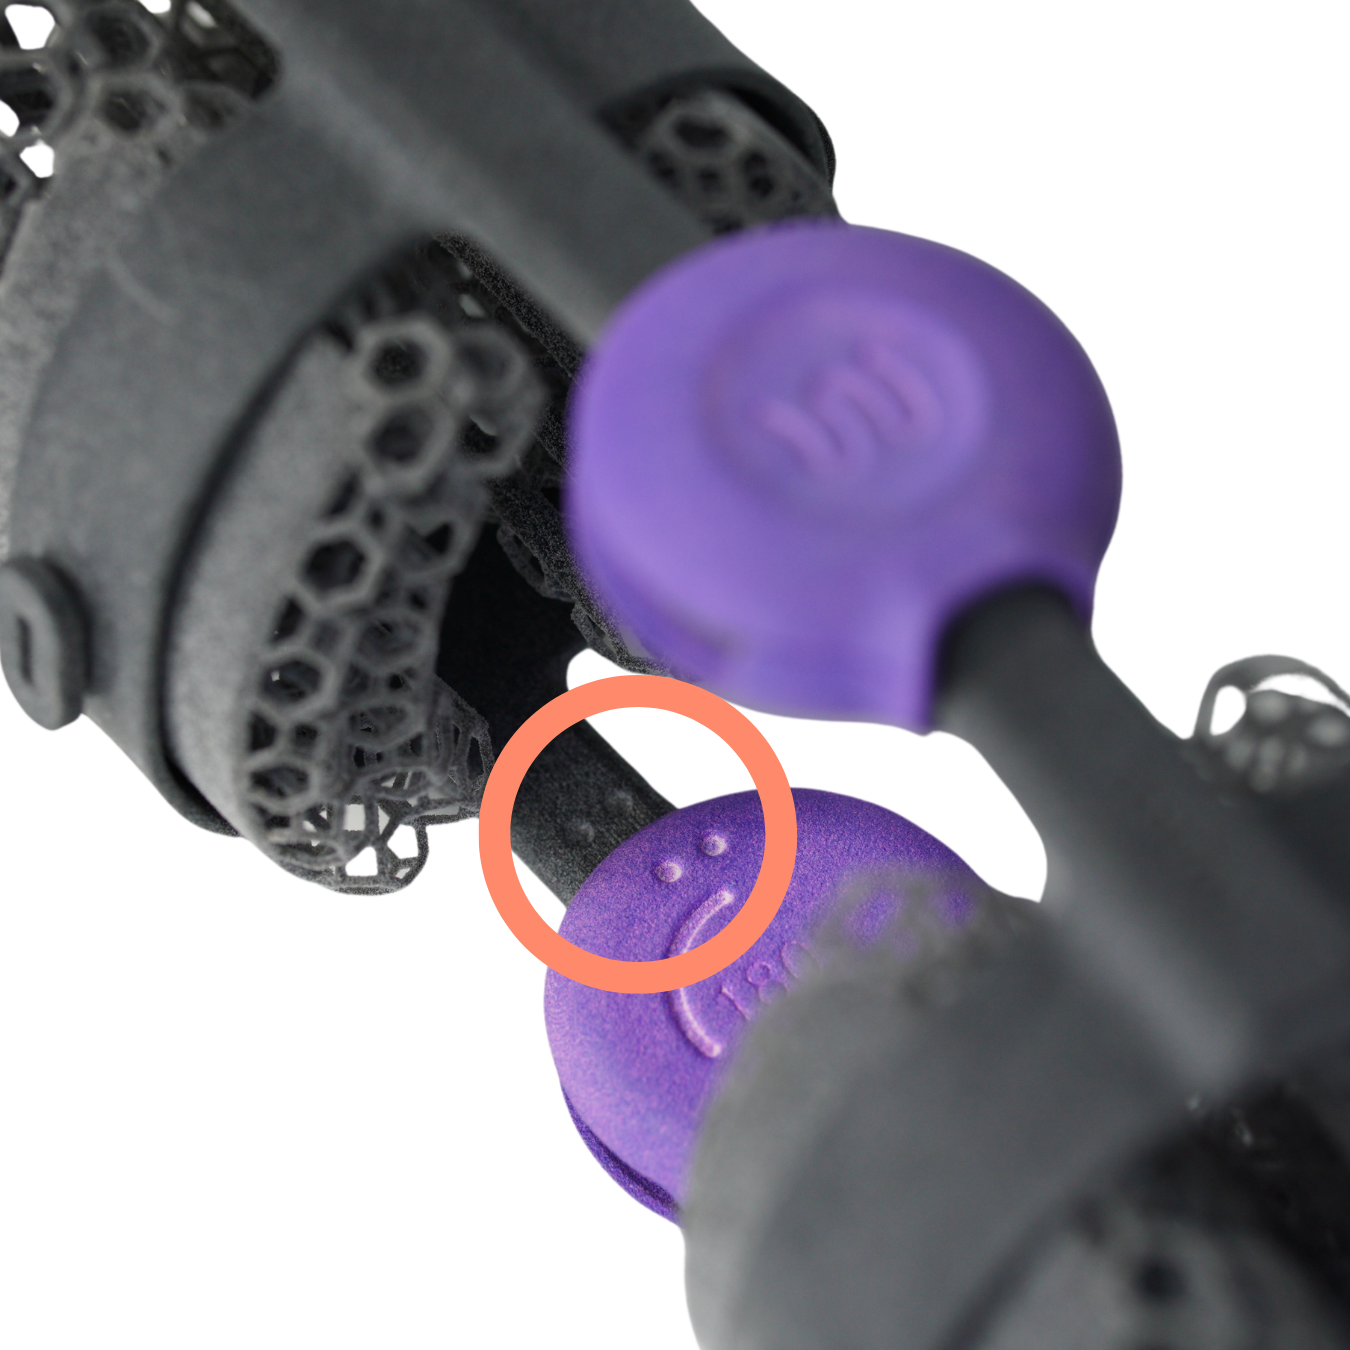
WIMBA Token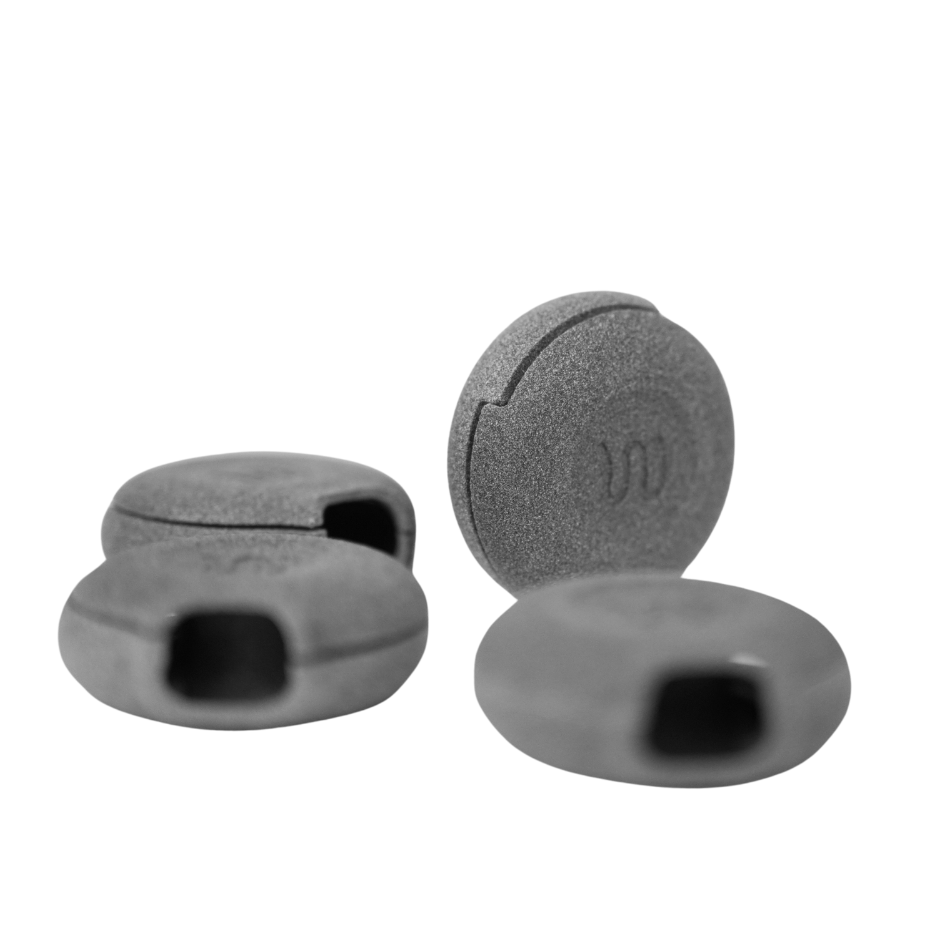
The WIMBA Token determines the range of motion in which the orthosis works. Your veterinarian or physiotherapist will let you know if you need to exchange it do not change the range of motion by yourself.
Every WIMBA Token consists of 2 parts:
- Inside part: it determinants the angle of flexion in orthosis
- Outside part: cover, with written “W” on it.
Reinforced WIMBA TokenIf the Tokens included with your order are the reinforced version, they will come equipped with TPU plugs placed on the outer side. These TPU plugs feature the same dot markings as the standard Tokens to ensure correct installation. To be installed properly, the 'W' marking should be upright. |
To exchange the Tokens:
Look for dot markings on the inner axis of the orthosis and the Tokens.
Fasten the Tokens according to the markings:
- One dot on the orthosis should align with the Token that has one dot.
- Similarly, two dots on the orthosis should match two dots on the Token.
- Open the Tokens you want to replace.
- Look for dot markings on the inner axis of the orthosis and the Tokens.
- Fasten the new selected Tokens according to the markings.
- Parts of Tokens with range numbers should be clipped in from the inside of the hinges.
- Parts of Tokens with a "W" should be fastened from the outside.
- WIMBA Token with One Dot
- WIMBA Token with Two Dots
Recommended Use and Application
- WIMBA Tarsus Orthosis Go is a medical device and should be used solely at the discretion of a veterinarian or physiotherapist.
- While using the orthosis, the dog must be under constant surveillance of the owner.
- We recommend using a bandage (vet wrap) or a thin breathable material under the orthosis to prevent rubbing, especially during the initial wear period.
- During the first week of use, the orthosis should be worn for up to fifteen minutes while controlled leash walking, a maximum of three times a day. Subsequently, increase the wearing time every two days by fifteen minutes. The time frame may vary depending on the case and the dog's behavior. Please, see below the Recommended Wear Schedule.
|
DAY |
TIME |
FREQUENCY |
|
1 |
15 Minutes |
Up to 3 times a day |
|
2 |
15 Minutes |
Up to 3 times a day |
|
3 |
30 Minutes |
Up to 3 times a day |
|
4 |
30 Minutes |
Up to 3 times a day |
|
5 |
45 Minutes |
Up to 3 times a day |
WIMBA orthosis should never be used for 24 hours a day!
|
NOTE: The veterinarian or physiotherapist should guide the animal throughout the entire course of treatment period. It is recommended that wearing schedules ONLY be modified by the veterinarian or therapist to meet therapeutic goals. |
WIMBA Tarsus Orthosis Go Donning
Prepare the orthosis
Check if the orthosis is clean, not damaged and has all of the components correctly applied.
Unfasten straps, so the open orthosis will be ready to be applied on the limb.
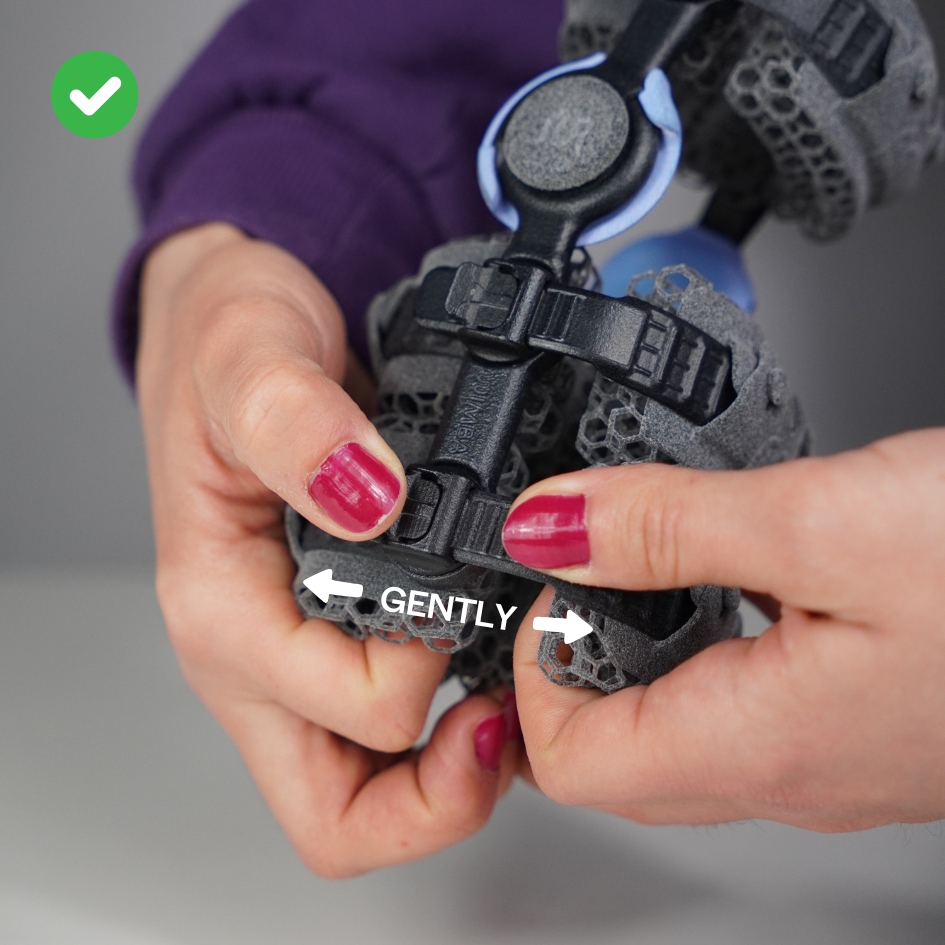
- press the release mechanism,
- while holding the release mechanism, gently push the strap in slightly to loosen the latch,
- while still holding the release mechanism, remove the strap from the slot.
CAUTION: Excessive pressure on snaps will cause breakage.
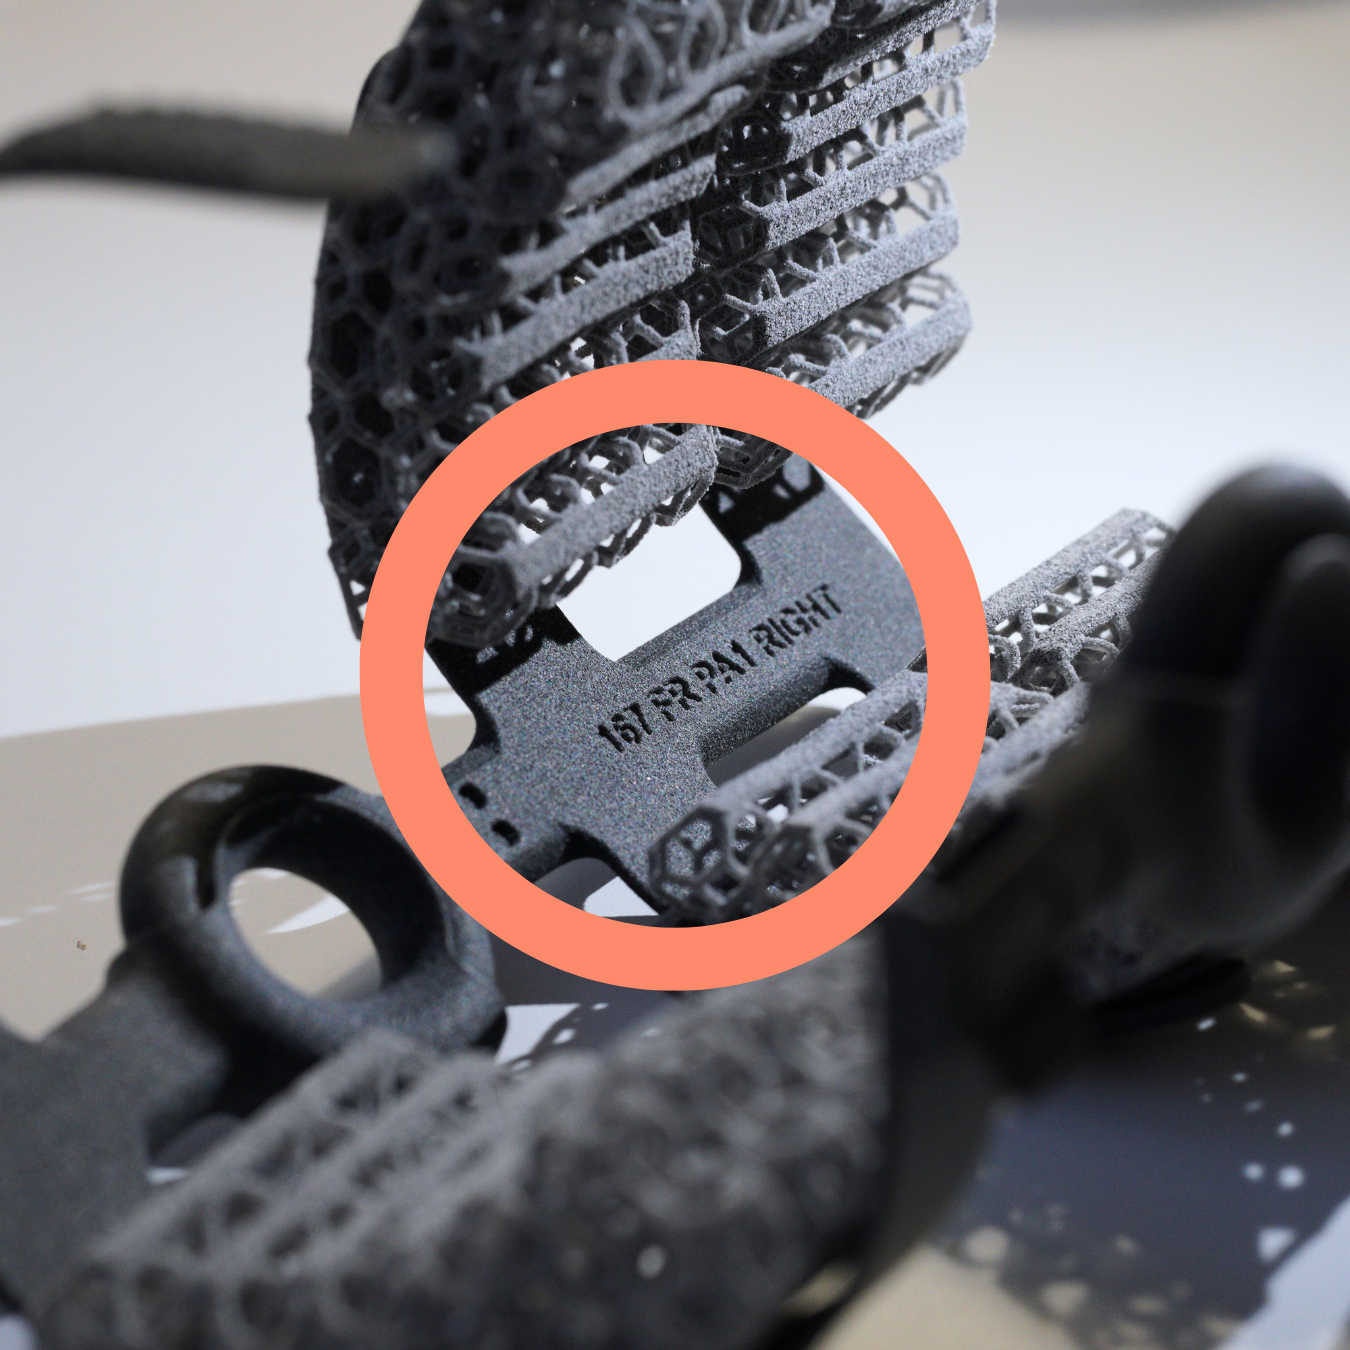
Especially if the dog has bilateral orthoses, locate the labels inside the brace that indicate right or left to ensure the brace is being placed on the correct limb.

Step 1 - Prepare the Paw
Ensure the paw is clean and dry before applying the orthosis. If you're unsure about your dog's skin durability and whether the brace might cause irritation or interfere with dew claw, we recommend using vet wrap underneath it.
|
CAUTION: Vet wrap applied too tight or incorrectly can cause swelling or other damage so follow WIMBA Providers instructions carefully. |
Step 2 - Positioning the Orthosis
Place the brace over the dog’s limb, ensuring correct orientation. The removable straps should be placed at the back of the limb. The side bars should run along the limb on the right and left sides, with hinges at the level of the tarsal joint.
Step 3 - Fastening the Orthosis
To fasten the strap, press the release mechanism, insert the strap into the designated slot, and then release the release mechanism to allow the pawl to prevent it from opening.Fasten the orthotic limb while the dog is standing with the limb on the ground, or lying down on the contralateral side. It is common to need to adjust the brace proximally once standing, if donned in a seated position. If your WIMBA Token allows range of motion, lift the paw and flex the tarsal joint (ankle) to ensure proper possibility of movement.
Step 4 - Ensuring Even Tightening
If the strap is fastened on both sides, ensure even tightening to avoid point loading.
Step 5 - Correct Fit
A properly fitted and used orthosis contains the following elements.
- The brace is in the correct position on the animal’s limb, not too high, too low, not rotated internally or externally, and WIMBA Tokens are in the joint area.
- It stays in the correct place during the animal's gait, without twisting.
- The brace is not overly tight and does not acutely provoke pressure sores on the dog’s limb.
- No hard elements of the brace (WIMBA Tokens, Brace Frame) contact the animal's limb during any phase of the gait.
NOTE: It is important to monitor your animal at all times to ensure these principles are followed while wearing the orthosis.
|
Please remember! Abrasion may occur as orthosis is an external device applied on the tissues that needs time to acclimatisation. If swelling or skin damage appears, remove the orthosis immediately and contact your WIMBA provider. |
Do’s and Don'ts of Your WIMBA Orthosis:
Usage:
- To ensure optimal functionality of the product, it is recommended to use it within a temperature range of 0°C to 40°C (32°F to 104°F). Prolonged exposure to temperatures outside this range may affect the product's performance.
- Do not heat or modify the orthosis in any way that could alter the structural integrity of the orthosis.
- Do not use the orthosis on abrasions or other skin injuries without consulting with your WIMBA provider.
- Do not allow your pet to bite the orthosis. It is necessary to monitor the dog while using the orthosis and not to leave the dog alone with the orthosis.
Cleaning and maintaining the orthosis:
- Clean the orthosis after contact with salt water, chlorine, sand, soil, mud, grass, leaves, snow etc. after daily activities.
- Hand-clean the orthosis with lukewarm water and mild soap.
- For larger stains, use a sponge or soft cloths to clean.
- Do not wash orthosis in a washing machine or use a hair dryer to dry orthosis.
- Allow the orthosis to air dry. When drying remove any excess water from orthosis to avoid the growth of bacteria and fungi.
Storage:
- Store the orthosis, when not in use, symmetrically fastened (the same number of hooks on the right and left sides).
- Do not place anything on the orthosis that may cause strain or compression to any part of the device or additional components, when stored.
- Do not leave the orthosis in direct sunlight or in any location where it will be exposed to unpredictable weather conditions.
- Do not store orthosis or spare parts in a location animals or children can obtain.