
Please note: If your patient weighs less than 15 kg, manual measurements must be taken in addition to the WimbaScan.
For dogs in the 7–15 kg weight range, the orthosis size is selected based on both the WimbaScan and the manual measurements. We will first assess whether the patient can be fitted with the Standard version, and if this is not suitable, the MINI version will be considered.
For the Wimba Stifle Orthosis PRO MINI, completing the measurement form is required. Download the measurement card.
To avoid the need for an additional appointment and repeated measurements, please complete the measurement form during the initial visit whenever the patient falls within this weight range.
1. Before the Patient Arrives
PHONE:
- Video quality: minimum 1080p resolution – use the highest possible resolution; 4K is ideal
- Make sure the camera lens is clean (no smudges or streaks)
- Use the phone’s standard camera app
- Disable any video filters or enhancement modes (e.g., beauty mode, AI optimization, HDR, stabilization)
- Do not use wide-angle lenses or any lens that may cause distortion at the frame edges
ROOM:
- Lighting: ensure the scanned limb is neither overexposed nor underexposed
- Background: avoid objects the same color as the Vet Wrap on the scanned limb
- Space: enough room for the mat, the standing dog, and the staff
WIMBA Scan Tools: prepare before the patient arrives
- Place the mat flat on a hard and even surface
- Ensure the WIMBA AutoDolly is charged
- Mount the phone on the AutoDolly and estimate the scanning trajectory based on the patient's size
- Prepare with staff and appropriate support for the patient:
- Wimba Vet Wrap
- Harnesses or other supports to hold the dog under the abdomen, if necessary
2. Prepare the Patient for Scanning
- Support the patient’s comfort and reduce anxiety
- Apply the bandage properly: it should be smooth and cover the affected area as shown in the graphics
- Correctly place the Patella Marker at the most cranial point of the patella
For long-haired dogs (to keep the fur in place):
- Limbs: use hair clips or additional Vet Wrap (plain or with a different pattern than the one used for the affected limb)
- Abdomen: use a towel or clothing (e.g., post-surgical suit)
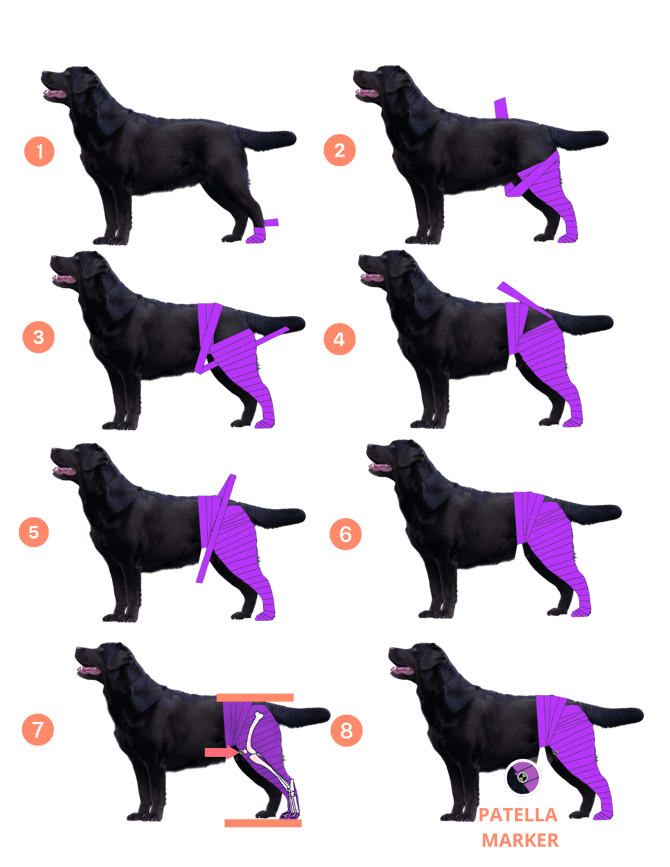
3. Scanning
- You will be scanning only the affected limb
- Use help if needed: extra people holding the dog, harnesses, etc.
- Ensure the patient is in the correct position:
- The scanned limb should not be in hyperextension or leaning far forward
- The dog should naturally load the affected limb (if scanning while standing on all limbs)
- If the dog’s front or other limbs are lifted, make sure the scanned limb remains loaded and does not hang passively without muscle tension
The dog can stand:
- On all limbs
- On both hind limbs – only if safety and stable support of the front of the body can be ensured, and the scanned limb is loaded without being overloaded or causing pain
- Only on the affected limb – only if the entire body can be safely and stably supported, and the scanned limb is loaded but not overloaded; recommended only for small dogs
Scanning Methods
There are two possible methods of scanning. The first one is using Autodolly.
Large dogs (when AutoDolly can pass under the abdomen):
- Option 1: Front paws and scanned one on the ground, contralateral limb bent and lifted
- Option 2: All limbs on the ground – the contralateral limb should be slightly positioned to the side and either forward or backward to avoid blocking the view of the scanned limb
- Make sure the limbs are spaced apart to provide clear visibility of the inner thigh
Small dogs (when AutoDolly cannot pass under the abdomen):
- Lift and support the entire dog, allowing only the scanned limb to touch the mat
Note: Since the limb must not float freely in the air and needs to be loaded, be careful not to overload it or cause pain You can use double-sided tape to gently secure the bandaged limb to the mat to minimize movement, even if the limb is not fully weight-bearing
The second method is a hand-hold scan.
- We recommend performing this scan with the dog standing on all four limbs
- Start from the inner side of the limb and record a full 360-degree view, rotating around the leg in the following order: inner side → front → outer side → back, and gently include a view from between the hind limbs if needed to complete the 360-degree coverage
- You do not need to switch the phone from hand to hand – the entire scan can be done while holding the phone in one hand
Important: - The scanned limb must remain visible throughout the entire scan
- The mat must be visible at all times
Remember: You can choose one of two scanning methods, or try both.
4. Review the Scan (Let the Patient Rest)
Check the following:
- Video resolution on the phone is 1080p or higher
Bandage:
- Has not slid down
- Is smooth and wrinkle-free
- Patella Marker is present and in the correct position
The scanned limb is not covered by:
- Fur from the limbs or abdomen
- The dog’s tail
- Hands holding the dog
Mat colors (blue/green) are visible
The entire wrapped limb is visible throughout the video:
- There is at least one full 360-degree pass
- The limb must be continuously visible (all wrapped area)
- Camera stays focused on the wrapped area throughout the scan
- The dog remains still during at least one full 360-degree pass
Especially for hand-held scans:
- Is the metatarsus visible from the back?
- Is the mat visible throughout the scan?
- Is the whole wrapped area visible throughout the scan?
Examples of WimbaSCAN
Rey